Working with PHP is great and although it isn't natively supported in Windows it is simple to install it and use it for running CMS Joomla or any other php related applications. Using IIS as the webserver is the best solution because it is tightly integrated in the OS so you are just extending the supported languages in this webserver.
What's needed:
- FastCGI
- PHP 5.3.1
- MySQL 5.0.90
- phpMyAdmin 3.2.5
- Joomla! 1.5
Step 1
Prepare Windows - Install IIS.
Open Add/Remove Windows Componentes and goto Application Server. Select
Internet Information Services (IIS).
Step 2
Installing FastCGI extension for IIS 6. FastCGI can be downloaded from
here.
There are versions for 32 and 64 bit versions of Windows.
I've chosen to install the
32 bit version.
Very straight forward installation. Just open the msi and follow the default options.
Nice Article on
how to configure the fastcgi extension.
Step 3
Installing PHP 5.3.1. PHP for Windows can be downloaded from
here.
As before you can choose between 32 and 64 bit versions. I've chosen this particular version:
VC9 x86 Thread Safe.
Select
IIS FastCGI
Leave the defaults.
Note: If you select all Extensions you might not be able to run php before installing runtimes for Oracle, etc.
Optional steps - for testing purposes:
Create a file in
C:\inetpub\wwwroot named
test.php and put the following content:
<?php
phpinfo();
?>
Open a browser and type:
http://localhost/test.php
You should get a page looking like this....
You can also install Windows Cache Extension for PHP to improve the overall performance of the site but
that is not our main purpose. Details about this extension can be found
here.
Step 4
Installing MySQL 5.0. MySQL binaries can be downloaded from
here.
You can choose the 32 or the 64 bit version. I've chosen the
32 bit MSI.
Choose Typical
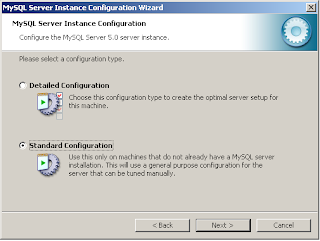
Keep the defaults until this screen where you can start configuring MySQL

Choose the "
Standard Configuration".
Install As Windows Service
Do not include Bin Directory in Windows PATH.
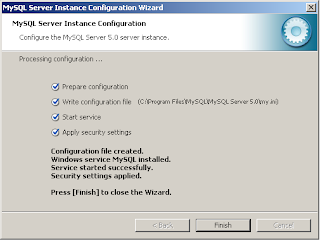
Put a "root" password. This password will allow you to control and change information inside the MySQL databases.
After pressing the Execute button MySQL set to be used.
Step 5
Installing phpMyAdmin
This tool allows one to manage MySQL databases. Its a bunch of PHP code so its good to try the installation. It can be found in
here. In this installation i've downloaded
3.25 ZIP file.
Follow this steps:
- Extract all the files to this folder:
C:\inetpub\wwwroot
- Rename the folder "phpMyAdmin-3.2.5-all-languages" to "
phpMyAdmin".
- Create a folder named config under the phpMyAdmin.
- Change permissions of
config so that "Internet Guest Account" can write in it (Modify permission).
- Open a browser and type:
http://localhost/phpMyAdmin/setup/:
- Press button "New Server".
- The defaults are ok. Press button "Save".
- Now press "Save" in the main window.
- Close all Browser windows.
You should now have a "config.inc.php" file in the folder
config.
Move the file to the main folder -
phpMyAdmin.
Remove the
config folder.
Open a browser and type:
http://localhost/phpMyAdmin/
You should now use root as the user and the password you've typed earlier as the password.

Installing Joomla.
This tool allows one to create a pretty powerfull CMS - Content Management System. It can be downloaded from
here.
In this installation it was installed the 1.5.15 ZIP file.
Create Database user joomladb - using phpmyAdmin do these steps:
- Open
http://localhost/phpMyAdmin/ - use the root and the password previously defined.
- Goto Privileges / Add new User
User name: joomladb
Host: localhost
Password: (use the Generate Password)
Database for user: Create database with same name and grant all privileges
Leave Everything else in default state.
Press
Go.
- Extract all the files to this folder:
C:\inetpub\wwwroot\joomla
- Change permissions so that "Internet Guest Account" can write in this folders: (Modify permission)
- C:\inetpub\wwwroot\joomla
- Open a browser and type: http://localhost/joomla. It should start the configuration wizard.
- Choose Language
- Pre-installation Check. Everything should be green.
- License - Press Next
- Database Configuration. Set the follow information:
- Database Type: mysqli
- Hostname: localhost
- Username: joomladb
- Password: the password used in the creating of joomla user (in phpMyAdmin)
- Database name: joomladb
Press Next.
- Ftp Configuration - Press Next
- Main Configuration:
- Site Name: Put a name of the site
- Fill out the email, administrator password.
- To see some Sample Data press the "Install Sample Data" Button.
Press Next.
Now you must create a file named "
configuration.php" under the
joomla folder and copy-paste the contents of the textbox to it.
Now remove the
c:\inetpub\wwwroot\joomla\installation directory.
To see the main page:
http://localhost/joomla/
To go to the Admin Page:
http://localhost/joomla/administrator/
Final Considerations
Alternativelly you could install XAMPP but there are several reasons for not to do it:
- it uses Apache instead of IIS. Not argueing if Apache is better or worse than IIS but it seems to me to be a nonsense to have 2 webservers installed in the same machine. I'd rather select other OS like linux if I needed only PHP.
- its for developer purposes only. No particular security measures are set to prevent sites under XAMPP from being trashed.
- better control of all the features. By installing only what you need there are less chances that some of the unused features might damage the site.
Additional information can be found on this sites


